If Scanning Documents to a File Server Is Failed (SMB)
16-Dec-2011
8200281200
Issue
Document cannot be sent to a file server.
Cause and Solution
If you cannot send a document to the file server, check the following:
Wait for a while. Immediately after the main power is turned ON, the machine cannot send documents.
If you still have a trouble, check the following.
1. On the <Select Send Type> screen use [
 ] , [
] , [  ] or
] or  (Scroll Wheel) to select <Address Book> and press [OK], or press the right Any key to select <One-touch>.
2. Use [
] , [ ] or (Scroll Wheel) to select the destination, and press the left Any key to select <Reg/Edit/Erase>.3. Use [
] , [ ] or (Scroll Wheel) to select <Confirm/Edit Address Book Dest.>, then press [OK].4. Use [
] , [ ] or (Scroll Wheel) to select <Display Destination>, then press [OK].5. Check the registered address.
Check the user name, and password if required.

 Checking the settings on the file server
Check if [Computer name] and [Share name] set on the computer correspond to ‹Host Name> and ‹Folder› set in the machine.
1. Check the computer name on the [System Properties] dialog box.
 For Windows 2000, right-click the shared folder and select [Sharing] to open the [‹folder name› Properties] dialog box. For Windows Server 2003, right-click the shared folder and select [Sharing and Security...] to open the [‹folder name› Properties] dialog box. For Windows XP, right-click the shared folder and select [Sharing and Security...] to open the [‹folder name› Properties] dialog box. For Windows Vista, right-click the shared folder and select [Share...] to open the [File Sharing] dialog box. For UNIX/Linux, check the Properties of the Samba shared folder.
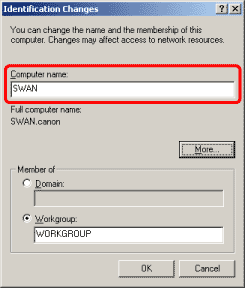

2. Check the address specified in the machine.
[Computer name] corresponds to ‹Host Name› and [Share name] corresponds to ‹Folder›.
If the address is not correct, register the correct address.
For instructions on how to register the Address Book or One-touch, see "Registering Destinations in One-Touch" and "Registering Destinations in the Address Book."
NOTE
- If you specify from <Windows (SMB): Browse> right after turning the main power ON, wait for the time set in <Startup Time Settings> to elapse before selecting <Windows (SMB): Browse>. Network transmission is not possible until this startup time elapses.
- You can enter up to 120 characters for <Host Name> and <Folder>.
- If you do not know the user name and password, contact the network administrator.
If you still have a trouble, check the following section.
If you send documents to a shared folder with access control, you must enter the user name and password. If the user name and password set for the file server address are not correct, you cannot send the document. For the user account, contact your network administrator.
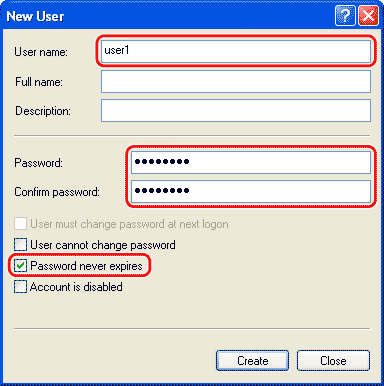
Checking the user name and password set on the computer1. Check the user name and password to access the shared folder.
 For Windows 2000, right-click the [My Computer] icon on the desktop -> click [Manage] to open the [Computer Management] window. For Windows XP/Server 2003, click [start] or [Start] on the Windows taskbar, right-click [My Computer] -> click [Manage] to open the [Computer Management] window. For Windows Vista, click [start] or [Start] on the Windows taskbar, right-click [My Computer] -> click [Manage] to open the [Computer Management] window. Under [System Tools], double-click [Local Users and Groups] -> right-click the [Users] folder -> click [New User].
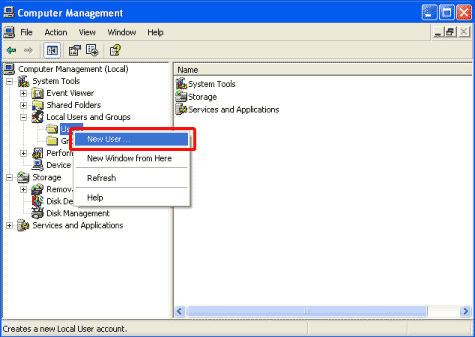
In the [New User] dialog box, check the user name in [User name] and password.
If you still have a trouble, check the following section.
Set ‹SMB Setting› in ‹Network Settings› -> ‹System Management Set.› of the ‹Additional Func.› menu to ‹On›.