Basic Methods for Scanning Documents to a File Server (SMB)
16-Dec-2011
8200286800
Solution
This section describes the basic procedure for sending scanned documents to a computer that acts as a file server on a network. Refer to the related information for the required settings to be made beforehand.
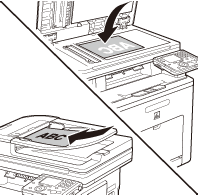
1. Place your originals.
2. Press  (Main Menu).
(Main Menu).3. Use [  ] , [
] , [  ] or
] or  (Scroll Wheel) to select <Send/FAX> or <Scan to Store>, then press [OK].
] , [ ] or (Scroll Wheel) to select <Send/FAX> or <Scan to Store>, then press [OK].If you select <Scan to Store>, use [ ] , [ ] or (Scroll Wheel) to select <Store on File Server>, then press [OK].
] , [ ] or (Scroll Wheel) to select <Store on File Server>, then press [OK].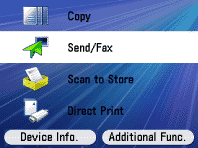
4. Use [ ] , [ ] or (Scroll Wheel) to select <Enter File Server (New)>, then press [OK].
] , [ ] or (Scroll Wheel) to select <Enter File Server (New)>, then press [OK].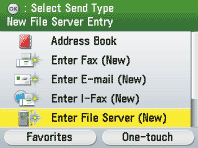
NOTE
You can also specify addresses using the Address Book or One-touch registered beforehand. For instructions on how to register or use the Address Book and One-touch, refer to the related information.
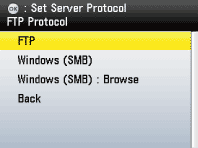
5. Specify the file server's address.
- Select <Windows (SMB)> if you want to enter the file server address directly.
- Select <Windows (SMB) : Browse> if you want to browse and specify the file server on a network.
6. Make the scan settings you require.

7. Press  (Start).
(Start).- Scanning starts if the original is placed in the feeder, and the scanned data is sent to the specified destination when scanning is complete.
- To cancel scanning, press the left Any key to select <Cancel> or press
 (Stop).

NOTE
If you place the original on the platen glass, select the original size and press (Start) to scan each sheet of originals and press the right Any key to select <Done>.
(Start) to scan each sheet of originals and press the right Any key to select <Done>.