Correcting unwanted spots with Digital Photo Professional Ver.3.9 (Copy Stamp Tool)
26-Aug-2010
8200331200
Solution
You can correct images with Digital Photo Professional. This section describes how to correct images using the repair function so that the unwanted spots (spots you want to delete) on the image blend in with the surrounding color. Window 7 is used in this description, but the procedure is mostly the same if you use Windows Vista, Windows XP or Mac OS X.
IMPORTANT
- A dust-erased image does not change, merely dust erasure information is saved to the image. The dust-erased RAW image actually becomes a dust-erased image when converted to a JPEG or TIFF image and saved.
- Check dust-erased images in the copy stamp window. You cannot check them in other windows.
1. Start Digital Photo Professional, and then display the image you want to correct.
2. Click [  ](Stamp) in the toolbar.
](Stamp) in the toolbar.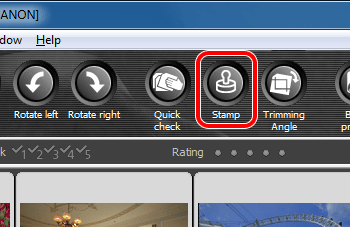
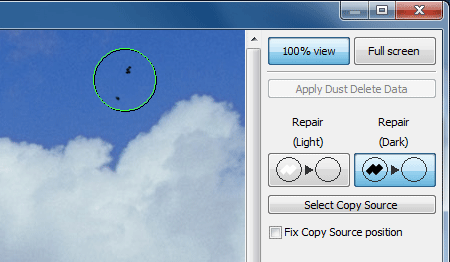
3. Double-click the image or click the [100% View] button to display the image in the 100% view. You cannot use the copy stamp tool if the image is not displayed in the 100% view.
4. Put your mouse pointer on the image. When its shape changes to [  ], drag the image to display the section you want to correct.
], drag the image to display the section you want to correct.5. Specify the correction range. When you click the [Repair(Dark)] button, the shape of the mouse pointer changes as shown below. Position the circle so that it covers the unwanted spot. If the unwanted spot is darker than surrounding color, use [Repair(Dark)].
6. Cover the unwanted spot with the correction range and click to delete the spot. If the image cannot be corrected, [  ] will be displayed.
] will be displayed.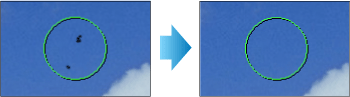
To correct another section of the image, cover the spot with the mouse pointer and click it. If you need to scroll to display the section to be corrected, cancel the repair function by clicking the right button on the mouse or clicking the [Repair(Dark)] button, and then perform the operation again from step 4.
7. When you finish making corrections, click [OK] to close the copy stamp window.
The [  ](Copy stamp) mark is displayed on an image from which dust spots have been erased.
](Copy stamp) mark is displayed on an image from which dust spots have been erased.8. Save the corrected image.
The image becomes a dust-erased image by converting to a JPEG or TIFF image and saving.
This completes the procedure of correcting the image.