Paper Does Not Feed Properly
27-May-2009
8200543100
Issue
Cause and Solution
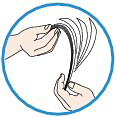
- When loading two or more sheets of paper, flip through the paper before loading.
- When loading two or more sheets of paper, align the edges of the sheets before loading.
- When loading two or more sheets of paper, make sure that the paper stack does not exceed the paper load limit. However, proper feeding of paper may not be possible at this maximum capacity depending on the type of paper or environmental conditions (either very high or low temperature and humidity). In such cases, reduce the sheets of paper you load at a time to less than half of the paper load limit.
- Always load the paper in portrait orientation, either in the Rear Tray or the Cassette, regardless of the printing orientation.
- When you load the paper on the Rear Tray, load the paper with the print side facing UP and slide the Paper Guides to align with the both sides of the paper.
- When loading paper in the Cassette, load the paper with the print side facing DOWN. Align the right edge of the paper stack against the right edge of the Cassette and slide the Paper Guides against the left and bottom edges of the stack.
Loading Paper
Paper Source to Load Paper
The printer has two paper sources to feed paper; Cassette and Rear Tray.
You can load paper in either one of the paper sources, depending on the page size and media type of paper. Paper is fed from the Cassette or Rear Tray depending on the selection of the page size or media type.
See [ Media Types You Can Use ]
See[Loading Paper]
Media Types You Cannot Use
Do not use the following types of paper. Using such paper will cause not only unsatisfactory results, but also the printer to jam or malfunction.
- Folded, curled, or wrinkled paper
- Damp paper
- Paper that is too thin (weighing less than 17 lb / 64 g/㎡)
- Paper that is too thick (weighing more than 28 lb / 105 g/㎡, except for Canon genuine paper)
- Paper thinner than a postcard, including plain paper or notepad paper cut to a small size (when printing on paper smaller than A5)
- Picture postcards
- Postcards affixed with photos or stickers
- Envelopes with a double flap (or sticker flaps)
- Envelopes with an embossed or treated surface
- Envelopes whose gummed flaps are already moistened and adhesive
- Any type of paper with holes
- Paper that is not rectangular
- Paper bound with staples or glue
- Paper with adhesives
- Paper decorated with glitter, etc.
When printing on envelopes, refer to [ Loading Envelopes ], and prepare the envelopes before printing.
Once you have prepared the envelopes, load them in portrait orientation. If the envelopes are placed in landscape orientation, they will not feed properly.
* If the paper source setting is not changed since you purchased this printer, the paper source for plain paper is the Cassette.
- Setting with the printer driver:
- Switching the Paper Source to Match the Purpose
In this printer, there are two paper sources, a rear tray and a cassette.
You can facilitate printing by selecting a paper source setting that matches your print conditions or purpose.
The procedure for setting paper source is as follows:
You can also set the paper source on the Quick Setup tab.
1. Open the printer driver setup window
2. Select the paper source
From the Paper Source list on the Main tab, select the paper source that matches your purpose.
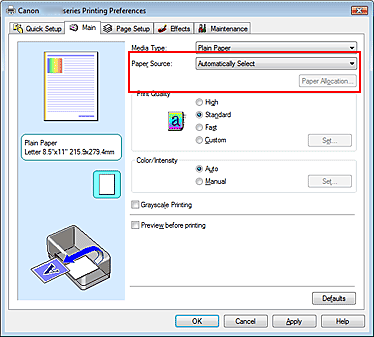
- Automatically Select
Plain paper whose Page Size is Letter 8.5"x11", A5, A4, or B5 is fed from the cassette. Other sizes of plain paper and paper types other than plain paper are fed from the rear tray.
- Rear Tray
Paper is always fed from the rear tray.
- Cassette
Paper is always fed from the cassette.
IMPORTANT
- Plain paper that is not Letter 8.5"x11", A5, A4, or B5 and paper types other than plain paper cannot be fed from the cassette.
Continuous Autofeed
If plain paper runs out in the specified paper source, the printer automatically switches the paper source.
When printing a large volume of data, load plain paper of the same size in both paper sources. You can therefore reduce the trouble of having to load paper because the printer automatically switches the paper source when paper runs out in one paper source.
IMPORTANT
- Continuous Autofeed is unavailable when paper other than Plain Paper is selected for Media Type.
- Since the printer feeds paper from the paper source that was being used the last time Continuous Autofeed was selected and printing ended, load the same paper in both the rear tray and the cassette.
- Paper Allocation
When the media type for the print data is plain paper and the paper size matches the paper allocation setting, the printer automatically feeds paper from the cassette. If not, the printer feeds paper from the rear tray.
To change the paper allocation settings, click Paper Allocation..., specify the Paper Size to be loaded in the cassette, and then click OK.
When you load frequently used plain paper in the cassette, the printer feeds paper from the rear tray when the print data uses a different type of paper. You can therefore reduce the trouble of having to load different paper.
3. Complete the setup
Click OK.
When you execute print, the printer uses the specified paper source to print the data.
- For information on the paper source for plain paper when the Paper Source on the printer driver is set to Automatically Select:
- Setting the Paper Source for Plain Paper
When you select Automatically Select from Paper Source, you can use the printer driver to select the paper source for plain paper.
The procedure for setting the paper source is as follows:
 Paper Source Setting for Plain Paper
1. Open the printer driver setup window
2. Click Paper Source Setting for Plain Paper on the Maintenance tab
The Paper Source Setting for Plain Paper dialog box opens.
3. Transmit the settings
Select the paper source for plain paper, and then click the Send button.
The selected settings are enabled hereafter.
IMPORTANT
- The descriptions in the printer manual assume that the plain paper is supplied from the cassette. When you change the paper source setting, replace all instances of "cassette" with the new paper source.
If the paper tears in the Rear Tray, see [ Paper Jams ] to remove it.
If there are any foreign objects in the Rear Tray, be sure to turn off the printer, unplug it from the power supply, then remove the foreign object.

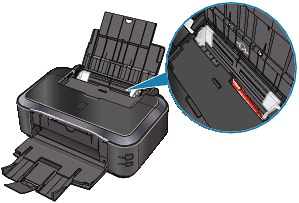
Paper does not feed properly if the Inner Cover is even slightly open.
Printing on DVD/CDs
Items to Prepare
The following items are needed to print on DVD/CDs:
See[Printing on DVD/CDs ]
NOTE
Cleaning the Paper Feed Roller will wear the roller, so perform this procedure only when necessary.
Cleaning the Paper Feed Rollers
Cleaning the Paper Feed Rollers
Cleans the paper feed roller. Perform feed roller cleaning when there are paper particles sticking to the paper feed roller and paper is not fed properly.
Check 9: If two or more sheets of paper feed from the Cassette at once, clean the inside of the Cassette
For information on cleaning the inside of the Cassette, refer to [ Cleaning the Pad in the Cassette ].
Paper may be jammed if the Rear Cover is not closed completely. Push the Rear Cover until it is closed completely.