How to Set the Microphones (XA10)
16-May-2012
8201096700
Solution
You can record audio using the built-in microphone, optional external microphone (XLR or MIC terminal) or line input (XLR terminal). For external microphones or audio sources connected to an XLR terminal, you can select the audio input independently for channel 1 and channel 2.
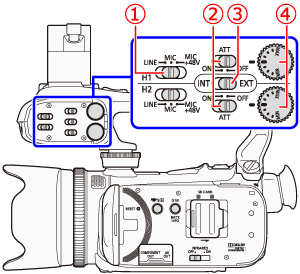
 XLR terminal switches for CH1 and CH2
 ATT (microphone attenuator) switches for CH1 and CH2
 Audio input switch
 Audio level dials for CH1 and CH2
NOTE
For details on how to attach an external microphone to your camcorder, please see "How to Attach An External Microphone".
When using the built-in microphone or an external microphone connected to the MIC terminal, set the audio input switch to <INT>.

NOTE
- If you connect a microphone to the MIC terminal while the audio input switch is set to <INT>, the camcorder will switch automatically from the built-in microphone to the external microphone.
- When using an external microphone, make sure that the jacket covering above the plug is smaller than φ9.5 mm.
- Setting the XLR Terminal
1. Connecting an External Microphone to an XLR Terminal.
2. Set the audio input switch to <EXT>.

3. Set the XLR terminal switch of the desired channel to <LINE> or <MIC>.
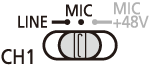
- To supply a microphone with phantom power, set the switch to <MIC+48V> instead. Make sure to connect the microphone first, before turning the phantom power on. Keep the microphone connected when turning off the phantom power.
- When using the XLR terminal to record to only one channel, use the CH1 input terminal and set the XLR terminal switch for CH1 to <LINE>, <MIC> or <MIC+48V>.
- Selecting the Recording Channel
You can select to which channel the camcorder will record audio.
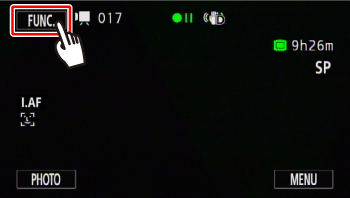
1. Touch [  ].
].
].
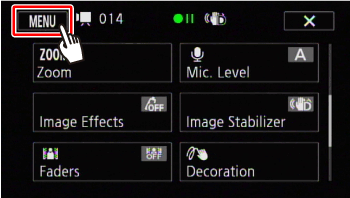
2. Touch [  ].
].
].
3. Drag your finger up and down to display the rest of the panel and then touch [ XLR Rec Channel ].
Drag your finger up and down to display the rest of the panel and then touch [ XLR Rec Channel ].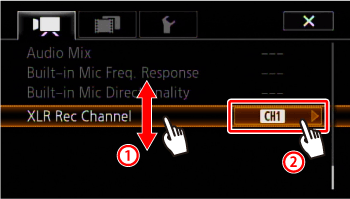
4. Touch [CH1] or [CH1/CH2].
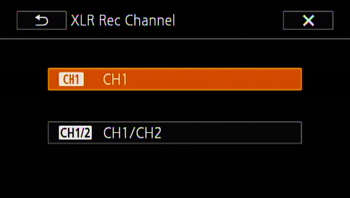
CH1: Records audio to each channel separately. Audio input into CH1 is recorded to channel 1, while audio input into CH2 is recorded to channel 2.
CH1/CH2: Audio input into CH1 is recorded to both channels. Audio input into CH2 will not be recorded.
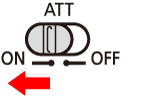
- Activating the Microphone Attenuator
You can activate the external microphone’s attenuator (20 dB) if the XLR terminal switch is set to <MIC> or <MIC+48V>.
Set the ATT switch of the desired channel to <ON>.
IMPORTANT
When connecting a microphone or device that does not support phantom power, make sure to set the XLR terminal switch to <MIC> or <LINE>, respectively. If you set the switch to <MIC+48V>, the microphone or device may be damaged.
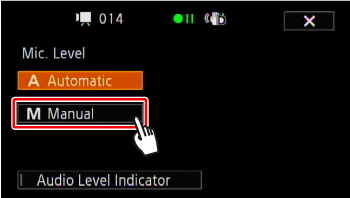
1. Touch [ ].
].2. Touch [Mic. Level].
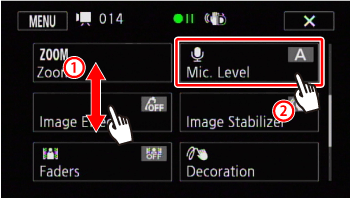
3. Touch [M Manual].
4. Touch and hold [  ] or [
  ] to adjust the audio recording level as necessary.
] or [ ] to adjust the audio recording level as necessary.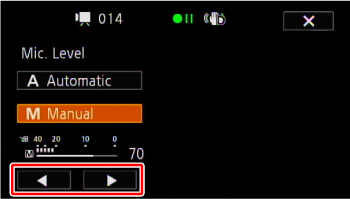
- As a guideline, adjust the audio recording level so that the audio level meter will go to the right of the -18 dB mark (about one mark right of the -20 dB mark) only occasionally.
- When the audio mix function is on, [INT] (built-in microphone) and [EXT] (external audio source) will appear next to the audio level indicator.
NOTE
Touch [A Automatic] to return the camcorder to automatic audio recording levels.
5. Touch [  ] to lock the audio recording level at the current level.
] to lock the audio recording level at the current level.REFERENCE
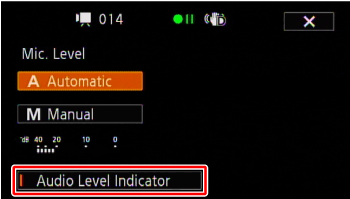
- To display the audio level indicator
Usually, the audio level indicator will be displayed only after activating the manual adjustment of the audio recording level. You can choose to display it also when the audio level is adjusted automatically.
Select [ A Automatic ], and then touch the [ Audio Level indicator ].
1. When a microphone or audio source is connected to an XLR terminal and the audio input switch is set to <EXT>, the audio level indicator will appear on the screen.
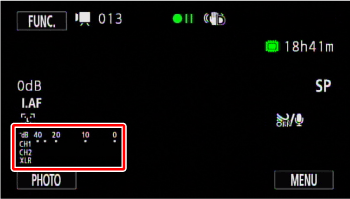
2. Turn the corresponding audio level dial to adjust the audio recording level as necessary.
As a guideline, adjust the audio recording level so that the audio level meter will go to the right of the -18 dB mark (about one mark right of the -20 dB mark) only occasionally.
NOTE
- When the audio level meter reaches the red point (0 dB), the sound may be distorted.
- If the audio level is too high and the sound gets distorted while using an external microphone connected to an XLR terminal, activate the microphone attenuator with the ATT switches. For a microphone connected to the MIC terminal, adjust the audio recording level manually.
- We recommend using headphones to check the sound level while adjusting the audio recording level or when the microphone attenuator is activated.