Printing images with your new SELPHY CP910 photo printer
20-Dec-2013
8201962100
Solution
Follow the below steps to print with your new SELPHY CP910 photo printer.
Prepare for printing as follows. This example shows a L-size Color Ink / Paper Set (sold separately), but the same steps are followed for other sizes.
Avoid getting dust on ink sheets or paper, which may cause banding or damage the printer.
1. Preparing the Ink Cassette
Check the ink cassette and ink sheet.
- Holding the ink cassette without touching the
 ink sheet, check the size (such as "L Size", "Postcard (4x6 in.) Size", or "Card Size") to make sure it matches the size of paper you will print on.
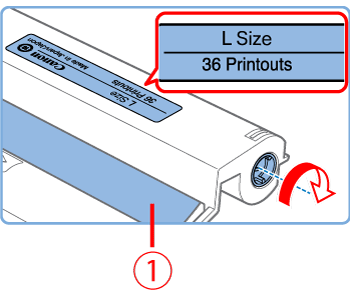
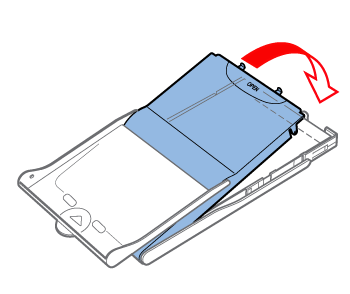
- Make sure the ink sheet is taut. Loose ink sheets may tear when loaded. If the sheet is loose, turn the sprocket as shown.
- For an ink cassette that has a lock on the bottom, press the lock (as shown) to release it as you turn the sprocket to make the sheet taut.

IMPORTANT
- Do not hold the ink cassette with wet hands. Avoid touching the ink sheet, and avoid getting dust on it. Dirt or moisture may cause banding or affect print quality, tear ink sheets and prevent printing, or damage the printer.
- When turning the sprocket, turn it gently, only until the sheet is taut. Forcing the sprocket or overtightening it may tear ink sheets and prevent printing, or SELPHY may run out of ink before paper.
- Never reuse ink cassettes, which may damage the printer or cause malfunction.
2. Preparing the Paper Cassette
2-1. Check the paper size.
- Check the size on the paper cassette (such as "L Size", "Postcard", or "Card Size") to make sure it matches the size of the ink cassette.
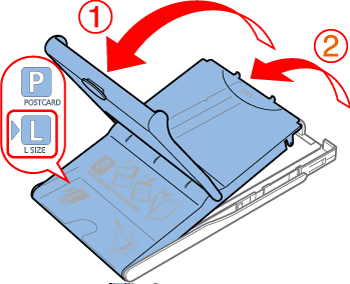
2-2. Open both covers.
- There are two layers of covers. First open the outer cover , and then the inner cover
 .
.
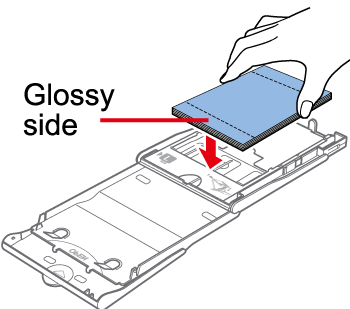
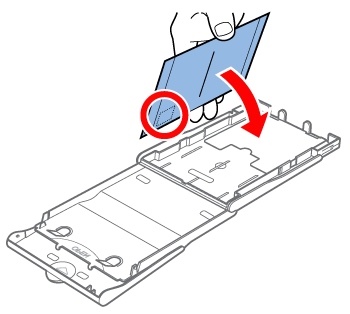
2-3. Load the paper.
- Load the paper in the paper cassette.
- The paper cassette holds up to 18 sheets. Loading 19 or more sheets may damage the printer or cause malfunction.
- Holding the paper as shown, load it with the glossy side up. (Do not touch the glossy side of the paper, which may affect print quality.)
- Remove any protective sheets from the paper, and load only paper into the cassette.
- When making postcard prints with space for a stamp, load the paper with the stamp area facing as shown.
2-4. Close the inner cover.
- Close the inner cover firmly until it clicks into place. Leave the outer cover open when printing.
IMPORTANT
- Use only paper in a genuine Canon Color Ink / Paper Set for SELPHY CP printers. Other paper, such as regular postcards or paper for SELPHY ES printers, cannot be used.
- Never do the following, which may damage the printer or cause malfunction.
- Loading paper upside-down, with the glossy and back sides reversed.
- Bending or separating paper at the perforations before printing.
- Using label paper whose upper label surface is peeling off or has been partially pulled up.
- Writing on paper before printing.
- Reusing paper, as by printing on blank areas.

- Do not touch the springs on the paper cassette. Accidentally bending the springs may prevent efficient paper feeding.
- Note that one spring is attached in the center on the top of card-size paper cassettes.
- Avoid touching or rubbing the glossy, printing side of the paper. Do not handle paper with wet hands, and keep paper free of dust. Dirt or moisture may cause banding or affect print quality, or damage the printer.
3. Loading the Cassettes.
3-1. Open the ink and paper compartment covers.
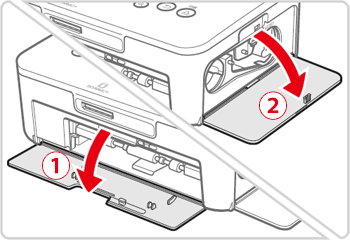 <Paper cassette compartment cover> <Ink cassette compartment cover>
3-2. Load the ink cassette.
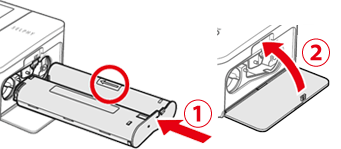 Insert the ink cassette into the printer in the direction of the arrow on the cassette until it clicks into place. Close the ink cassette compartment cover.
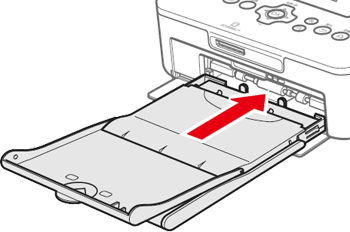
3-3. Load the paper cassette.
- Making sure the outer cover is open, insert the paper cassette all the way into the compartment.
4. Installing and Plugging in SELPHY.
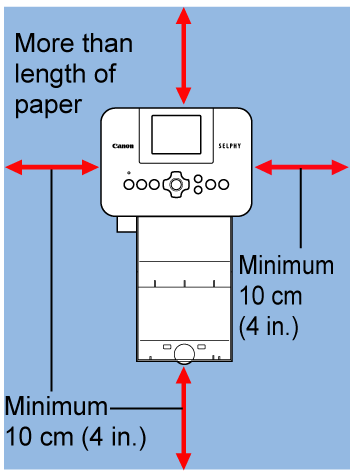
Choose the right place to put SELPHY.
- Place the printer on a table or other flat, stable surface. Never place the printer on an unstable or tilted surface.
- Keep the printer away from sources of electromagnetism or strong magnetism.
- Leave at least 10 cm (4 in.) of open space around the printer.
- Leave more open space behind the printer than the length of paper used, so that the paper can pass in and out of the printer freely when printing.
・Plug the adapter cord into SELPHY. Connect the power cord.
Insert the adapter plug fully into the power inlet on SELPHY.
・Connect the power cord.
Connect the power cord to the compact power adapter, and then  plug the other end into a power outlet.
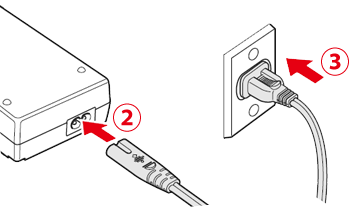
IMPORTANT
- Do not use the printer near motors or other devices that generate strong magnetic fields, or in dusty environments. This may damage the printer or cause malfunction.
- Do not place the printer near televisions or radios. This may cause the printer to malfunction.
Change the language of menus and messages.
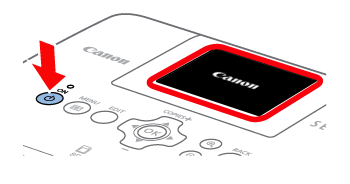
1. Turn on SELPHY.
- Hold the <
 > button until the screen below is displayed.
 - To turn off SELPHY, hold the < > button again until the screen changes.
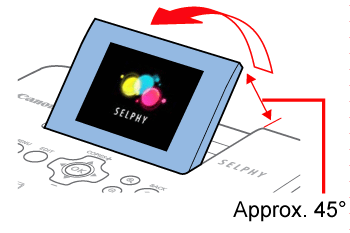
2. Raise the screen (LCD monitor).
- Never force the screen up more than 45°, which may damage the printer or cause malfunction.
3. Access the setting screen.
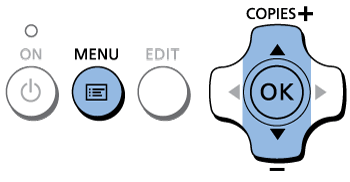
・Press the MENU button < >.
>.
>.・Press the < ><
><  > buttons to select [Change Settings], and then press the <OK> button.
>< > buttons to select [Change Settings], and then press the <OK> button.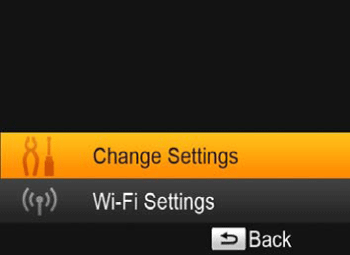
4. Access the language setting screen.
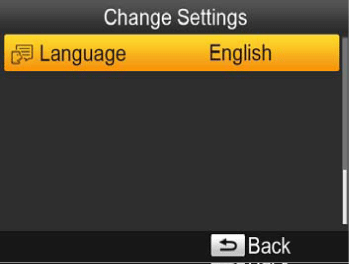
- Press the <>< > buttons to select [
 Language], and then press the <OK> button.
5. Choose a language.
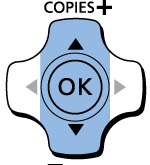
- Press the <><><
 ><
>< > buttons to select a language, and then press the <OK> button.
 - To return to the screen in step 2, press the <
 > button twice.
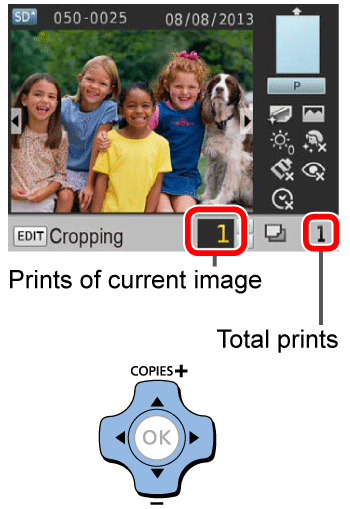
Select images and specify the number of prints as follows. Here, printing from an SD memory card is described as an example, but you can print from other memory cards with the same steps.
1. Insert the memory card into the slot.
- Insert the memory card facing as shown until it clicks into place.
- To remove the card, push it in until it clicks, and then slowly release it.
- The image display screen used in step 3 is displayed.

2. Choose an image.
- Press the < > <>buttons to select an image to print.
- To jump forward or back by five images, hold down the < > <> buttons.
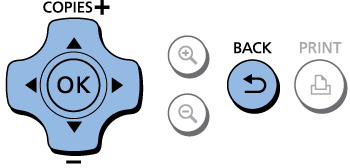
3. Specify the number of prints.
- Press the <><> buttons to specify the number of prints.
- To increase or decrease the quantity by five prints, hold down the <><> buttons.
- To print other images at the same time, repeat steps 2 – 3.
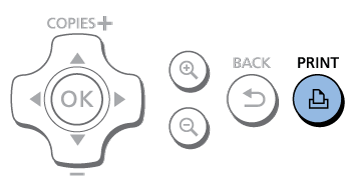
4. Print.
- Press the <
 > button to start printing.
 - While printing, paper passes in and out of the back of SELPHY several times. Do not touch the paper until printing is finished and the print is ejected onto the paper cassette.
- Do not allow 19 or more prints to collect in the ejection area on the paper cassette.
- To cancel printing in progress, always press the < > button.
IMPORTANT
- Never pull out the paper cassette, open the ink cassette compartment cover, or remove a memory card while printing or when you hear printer operation sounds immediately after it has been turned on. This may damage the printer.
- To cancel printing in progress, always press the < > button. Printing cannot be canceled by pressing the < > button, and unplugging the printer may damage it.
NOTE
- Image display in step 2 may take some time when memory cards contain many images.
- If a message indicates that DPOF images remain, see "Printing Using Camera Settings (DPOF Print)" in the Printer User Guide.
- You can specify up to 99 images in step 2 and up to 99 prints per image in step 3. However, the total number of prints cannot exceed 999.
- Even if you press the < > button to cancel printing, the printer will continue printing until the current sheet is finished